Search This Blog

Saturday, January 11, 2014

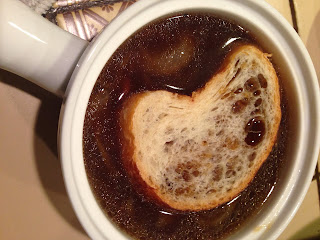
Recipe: French Onion Soup

So you open your fridge, and theres some fruit, a couple slices of cheese, a couple onions, maybe some milk, some lettuce, and about 76 different sauces. Its practically empty, just like your poor stomach. Well I found your solution, French Onion Soup, sounds very complicated and intimidating, but its actually quite simple and is composed mostly of things you probably already have lying around the house!

INGREDIENTS: 
4 Large Onions, Sliced thinly
2 cloves Garlic, minced
2 quarts (2 boxes) Beef Stock
Swiss cheese
Provolone cheese sliced
French bread, sliced thick
Dry White Wine
Sherry
Fresh Crushed Black Pepper
Bay Leaves
Butter
Grapeseed oil 
All Purpose Flour

STEP ONE: 
Heat pot to medium, add two pats of butter and oil (you can use all butter, but I wanted to make it a little healthier). When the butter melts, add the onions and stir until onions are coated.
Cover pot for 20 minutes on med-low until translucent. 

STEP TWO
Uncover and raise the heat to med- high, stirring every 5 minutes. Add chopped garlic. 
The bottom will begin to turn brown, this is good, it adds extra flavor! When the onions are basically as soft as can be, add a tablespoon of flour, and mix for one minute.
 

STEP THREE
Add stock, bay leaf, white wine, and let simmer for 30 minutes. (You should preheat the oven now at 400 on broil)
Pour individual ramekins or oven safe soup bowls, place sliced french bread on top, and cover with cheese, if the cheese is bigger than the bowl, leave it, it will leave a nice crust on the outside of the bowl.


STEP FOUR:
Place soup bowls on a cookie sheet in oven for about 5-10 minutes until the cheese is melted and brown and gooey! 


Thursday, August 29, 2013

RECIPE: Baked Hot Wing Chicken Drumettes

So basically, I'm in love with hot wings, kinda obsessed but there is one tiny problem, the two things my mom hates the most: chicken wings, and things that are fried, so what did I do? I made them baked and I used only drumettes, (the best part anyway in my opinion) and they turned out great! 

INGREDIENTS:

8 chicken drumettes
1/2 cup all purpose flour
2 tbs paprika
1 tbs cayenne pepper
1 tbs garlic powder
1/2 tbs dried oregano

4 tbs butter
1/2  cup ketchup 
1/4 cup Sriracha
3 tbs honey
1 tbs Worcestershire sauce

Spray oil

    1. First, Preheat your oven to 450 degrees. Then wash and dry your chicken pieces and place them into a plastic ziploc bag with the flour, paprika, cayenne pepper garlic powder and garlic powder. Shake the bag to make sure all the pieces are coated with the flour and place into the fridge for at least 1 hour.


    2. In a small pot, melt the butter, when it is fully melted, add the sriracha, ketchup, honey and worcestershire sauce, mix for a couple minutes until heated all the way through.  Set aside.


    3. After an hour, take out the drumettes from the bag and shake off excess flour and place them on an oven tray. Spray the chicken with the oil and put in the oven for about 15 minutes. Then, flip the chicken over, spray again, and bake for another 15 minutes. (different ovens may vary so just to be safe, use a meat thermometer if you can)

    4. After taking the chicken out of the oven, let it cool off for a couple minutes before handling. Pour hot wings into a bowl and coat all the chicken with your hot-wing sauce and serve while hot!


    Enjoy!


    RECIPE: Parmesan Potato Wedges

    What goes together better than potatoes and cheese? Not very many things. So this recipe makes a perfect side dish, or guilty pleasure snack. Enjoy!

    Ingredients:
    Red potatoes
    Parmesan cheese
    Extra virgin olive oil
    Garlic powder
    Dried Oregano
    Fresh Cracked Black pepper

    STEP ONE:
    Wash and throughly dry your potatoes. To cut them into wedges, cut them in half lengthwise, then again in half lengthwise, and then cut each 6 times into 12 pieces.

    STEP 2: Place potatoes into bowl and mix with oil, coating each piece.
    In another bowl, mix the parmesan, pepper, oregano, and garlic powder.
    Then mix!


    STEP 3: Bake in oven at 450, for about 15 minutes on each side
    This is what it should look like before you flip it for the first time

    STEP 4: Take out of the oven and mix a bit more parmesan cheese, because why not.. and serve hot! 


    Thursday, July 25, 2013

    HOW TO: Roast Garlic

    Roasting garlic is easy, and makes the garlic sweeter, softer and just that much more amazing in any dish. Add it to mashed potatoes, put it in pasta sauces, on pizza crusts, in soups or even just spread it on toasted bread... yum!
    So lets do it!

    STEP ONE:
    Use a whole head of garlic and cut off the top just to leave leave the garlic exposed, remove a couple of the outer layers, and drizzle on a tablespoon of extra virgin olive oil.


    STEP TWO:
    Wrap in foil, and place in oven at 375 for about an hour.
    If you would like to make more than one head, then place them all in a pan and cover entire pan with foil.  Remove when you smell that beautiful sweet garlic flavor and each clove is soft.

    STEP FOUR:
    Wait till completely cool and with a small cocktail fork or knife gently remove each clove from the skin. 
    Now be creative! 


    Sunday, July 21, 2013

    RECIPE: Drunken Onion Rings


    After hours of research and dozens of experiments in my kitchen, I have finally figured out the perfect Beer Battered Onion Ring recipe for crispy golden rings of deliciousness. The secret? TWO types of alcohol (hence the title "Drunken" Onion Rings). The Vodka helps create a crispy exterior while the beer gives the batter a light airy texture! Whoever said mixing alcohol didn't work was obviously mistaken..

    INGREDIENTS
    - Large Yellow Onions
    - Sadaf Grapeed Oil 
    - 1 cup All Purpose Flour
    - 1 cup Beer (8oz)
    - 1 shot of Vodka
    - a pinch of Cayenne Pepper
    - A tablespoon of Paprika


    STEP ONE:
    Peel and cut the onions into 1/2 inch thick slices. Separate the rings and place into a bowl. Sprinkle with flour.
    STEP TWO
    In a separate bowl add the one cup of flour, paprika, cayenne, beer and vodka and whisk until smooth.
    Then pour batter straight into the bowl of onions and mix until evenly coated.
    If the batter is too thick, use a little bit of water to thin it out; if the batter is too thin, whisk in a little more flour.

    STEP 3
    Heat the oil to 375 degrees or until the oil is glistening and has small ripples. Use tongs to grasp the onion ring, shake off any excess and place into the hot oil.
    A trick is to drop in a small one just to test the waters and see if its hot enough. Flip when golden brown (about 30 seconds)
    WARNING: DO NOT just plop the onion rings in there, the higher you drop it from, the bigger the splash!
    Do not place in too many onion rings at the same time, this will over crowd the pan and stick some rings together, drop the temperature and create underpar rings. Thats a no-no.

    STEP FOUR:
    Place rings on paper towels to absorb the liquid, and then devour.  


    Tuesday, June 25, 2013

    HOW TO: Chocolate Covered Strawberries


    Actually my favorite desert in the world, Chocolate Covered Strawberries!
    So why pay like $8 for one at a store, that has probably been sitting there for awhile when you can make it at home and be able to lick the melted chocolate spatula afterwards! Win-win!
    So lets begin

    INGREDIENTS:
    - Dark Chocolate
    - Strawberries

    I know I know, its a whole shopping list, so many ingredients.. my apologies! But seriously, you need DARK chocolate! Milk chocolate doesn't melt very well, and dark chocolate compliments strawberries much better anyways.
     So lets get started!

    STEP ONE:
    Create your own double boiler! I know most of you don't actually have one, and it's not really logical to invest in one, so you can just make it yourself!
    First you need a small pot, filled about half way with water, and a metal bowl that can sit on top of it comfortably. Simple!
    Now get the water boiling!
    STEP TWO:
    Wash and thoroughly dry the strawberries (if they are wet, the chocolate wont stick and you'll end up with watery chocolate.. not good) and cut the chocolate into small chunks for easier/faster melting.
    Once the water is boiling, add the chocolate to the bowl. Make sure you dont spread around the chocolate too much, you need a nice puddle in the middle to dip the strawberries in!

    STEP THREE:
    Once the chocolate is throughly melted, using the stem of the strawberry, gently dip and maneuver the strawberry around the chocolate to get a nice even coat all around. 
      
     
    Get creative!


    STEP FOUR:
    Line up the strawberries on parchment paper and place in fridge until chocolate hardens.

    And viola! It's that simple! Now if you have extra melted chocolate.. well you know what to do..
    (I like having my strawberries with the hot melted chocolate, even before it dries! yum.)

    Blogging tips